Use QR Codes to Check In Visitors
Let guests sign in at your meetings with a quick phone scan, and capture every visitor's contact details automatically.
What This Feature Does
The Club Schedule gives every club a set of visitor check-in QR codes. When a visitor scans one with their phone camera, they land on a short sign-in form for your club. Once they submit it:
- Their name, phone, and email are saved to your Visitor list (
/club/visitors/) - The visitor is tagged with the source they came from (In-Person, Zoom, or a specific event)
- If they checked the "send me information about joining" box, they're flagged as a warm lead — and, if you have marketing emails turned on, automatically enrolled in the welcome email sequence
The goal: replace the paper guest book with something your VP Membership can actually follow up on.
The Three Types of QR Codes
Your club has two QR codes built in automatically, and you can create as many event codes as you need:
| Code Type | Created Automatically? | Best For |
|---|---|---|
| In-Person | Yes | Print and place on the welcome table, lectern, or agenda handout |
| Zoom | Yes | Share on screen or paste in chat at the start of an online meeting |
| Event | No — you create one per event | Library demos, career fairs, conference booths, open houses |
Each code routes to the same form, but tags submissions differently so you can see where each visitor came from.
Before You Begin
You'll need:
- Officer access to your club (President, VP Education, Secretary, or Admin)
- An active club website — the QR code URLs use your club's website subdomain. If your website isn't activated yet, the QR codes will exist but won't work until you turn the website on. (See Create a Free Website for Your Club.)
Step 1: Open the QR Codes Page
- Sign in as an officer.
- From your dashboard, go to Club Admin and click Check-In QR Codes.
- Or visit
/club/checkin-qr-codes/directly.
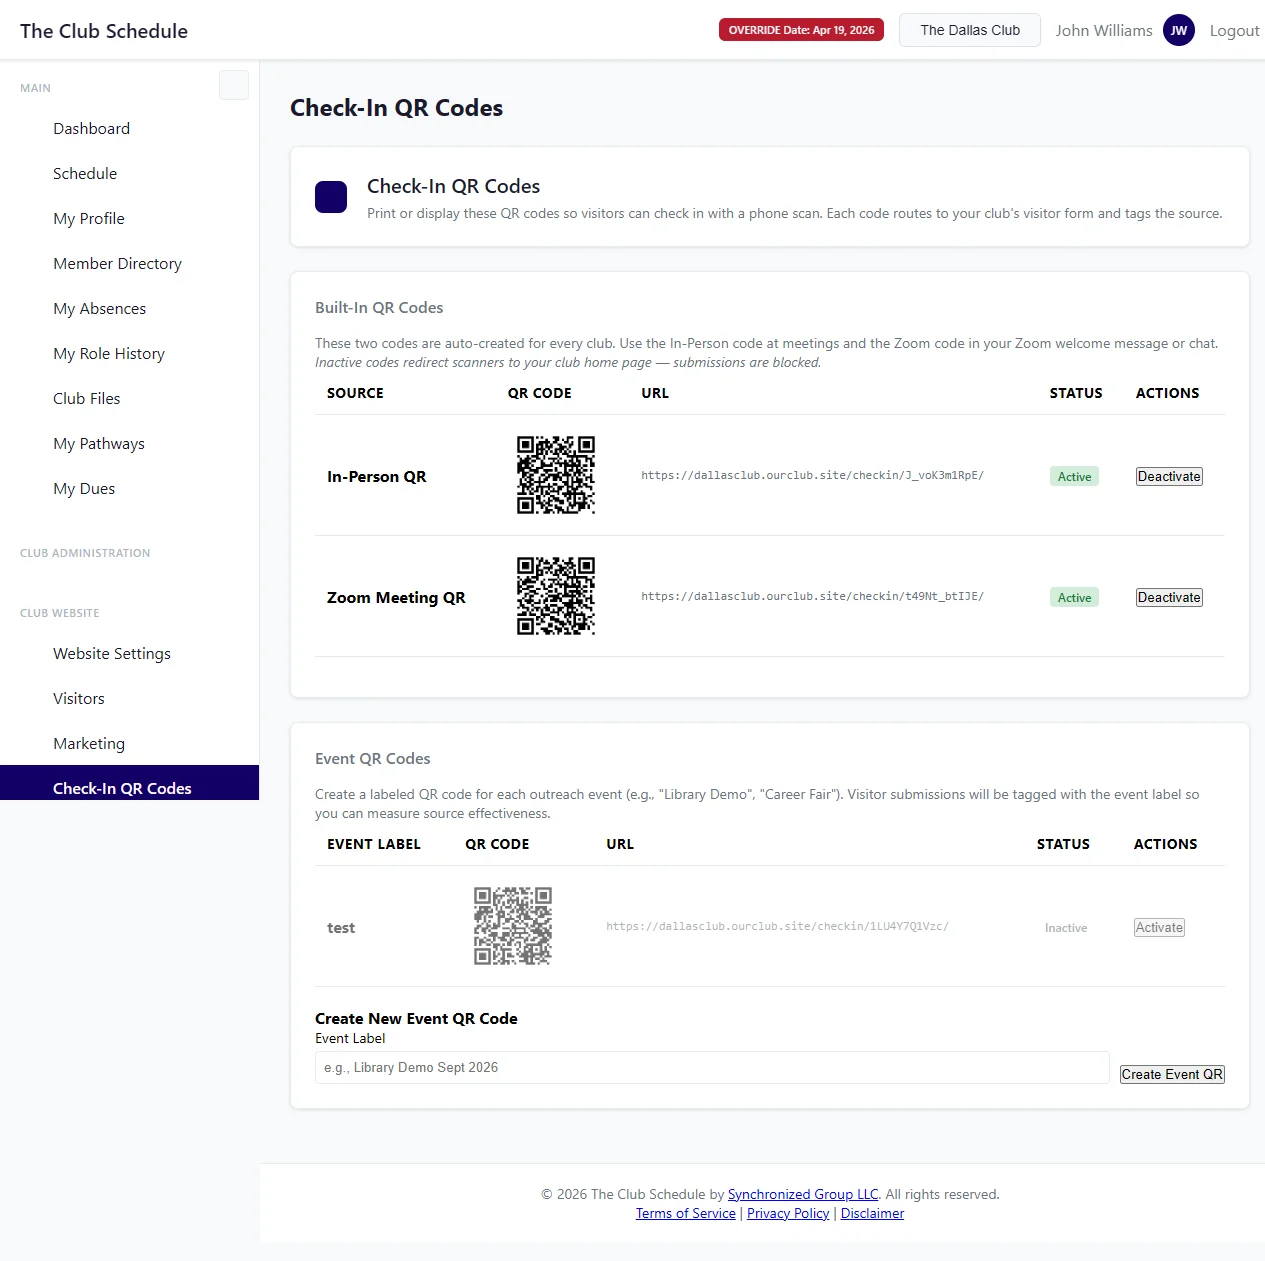
You'll see two sections:
- Built-In QR Codes — your In-Person and Zoom codes
- Event QR Codes — any event-specific codes you've created
Each row shows a preview of the QR image, the URL it links to, whether it's active, and an Activate/Deactivate button.
Step 2: Print or Display the Built-In Codes
For In-Person Meetings
- In the Built-In QR Codes section, find the In-Person row.
- Click the QR image (or right-click and Save As) to download the PNG.
- Print it on card stock or paper. Some good places to put it:
- On the greeter's welcome table
- On a small easel at the lectern
- On the back of your printed agenda
- When a guest arrives, simply ask them to scan the code with their phone camera to sign in.
For Zoom Meetings
- Find the Zoom row.
- Either:
- Share the QR image on screen during your welcome remarks, or
- Paste the URL (shown to the right of the QR image) into the Zoom chat as a backup
- Encourage guests to scan or click before the meeting begins.
Tip: Use both built-in codes — keep them separate even if every meeting is hybrid. The source attribution is genuinely useful when you're trying to understand which channel brings in more guests.
Step 3: Create an Event QR Code (Optional)
Use this whenever you do outreach away from your regular meeting — a library demo, a booth at a corporate event, an open house. A dedicated event code keeps that event's visitors clearly separated in your reports.
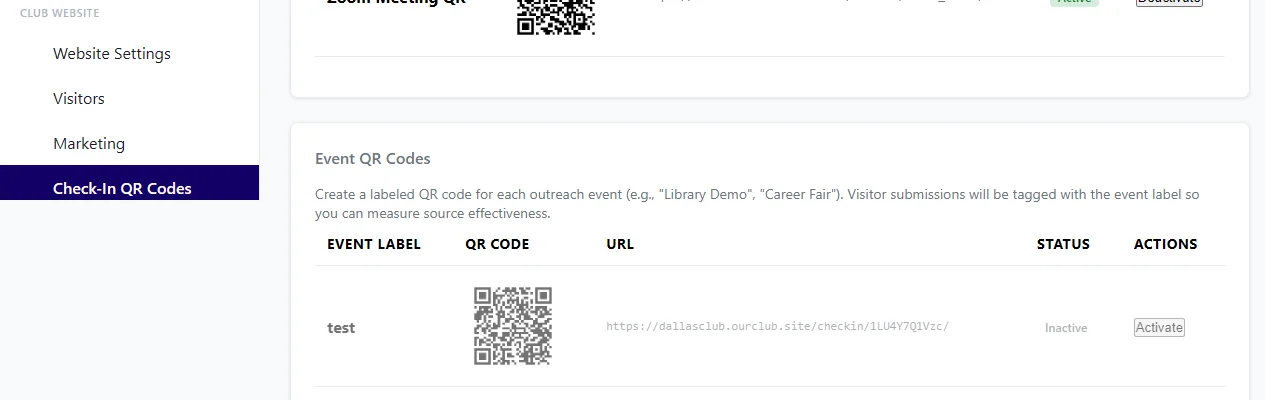
- Scroll to the Event QR Codes section.
- In the Create New Event QR Code form, enter a short, descriptive label, for example:
Library Demo Oct 2026Career Fair Spring 2027Open House March 12- Click Create Event QR.
- The new code appears in the list with its own QR image and URL. Download or print it for the event.
Tip: Always include a date in event labels. "Library Demo" gets ambiguous after the third year; "Library Demo Oct 2026" stays clear and sortable.
What Visitors See When They Scan
When someone scans one of your codes, they go to a simple form on your club's website that asks for:
- First name and last name
- Phone number
- Email address
- "Have you visited us before?" (yes/no — and if yes, how many times)
- A checkbox: "Yes, please email me information about joining this Toastmasters club."
After they submit, they see a brief "Thank you! Enjoy the meeting." page. The whole process takes about 20 seconds.
Step 4: See Who Checked In
Every submission creates or updates a record on your Visitor list.
- Go to Club Admin > Visitors (or
/club/visitors/). - New check-ins appear in the list, tagged with the source they came from (In-Person, Zoom, or your event label).
- Visitors who checked the "send me information about joining" box show a green Wants Join Info badge, and you can filter the list to show only those visitors.
If you have marketing emails enabled for your club, those join-curious visitors are automatically dropped into the welcome email sequence — no extra step required.
For full details on how to work the visitor list, see Track and Manage Visitors.
Deactivating a Code
If a printed QR code ended up somewhere you didn't intend, or you want to retire an event code:
- On the QR codes page, find the token.
- Click Deactivate.
Anyone who scans a deactivated code is silently sent to your club's home page — no form, no submission. The token isn't deleted, so visitors who already came in through it keep their attribution in your reports.
You can re-activate a code any time from the same screen.
Note: You can deactivate the built-in In-Person and Zoom codes, but you can't delete them. If you want to start fresh, just deactivate them and they'll stop accepting submissions.
Tips
- One code per channel. Even if every meeting is hybrid, keep In-Person and Zoom codes separate so attribution stays clean.
- Date your event labels. Future you will thank present you.
- Don't email the QR URL for cold outreach. This form is designed for visitors who are already at a meeting or event. Use the Visit Us form on your club website for cold prospects — it asks different questions and routes them through your visitor pipeline differently.
- Laminate the printed In-Person code. It lives on the welcome table for years; a $0.50 lamination saves you reprinting it every quarter.
- Encourage guests to scan even if they're regulars. Repeat scans don't create duplicate visitor records — the system updates the existing one.
Troubleshooting
"The QR code shows the URL as '(website inactive)'"
Your club website needs to be activated for the QR codes to work. Go to Club Admin > Club Website and publish your site. The codes will become scannable as soon as the website is live.
A guest scanned the code but I don't see them in the visitor list
- Confirm they actually submitted the form (some people scan, then forget to tap Sign In).
- Check that the QR code they scanned is Active on the QR codes page.
- Check the All Statuses filter on the visitor list — they may be assigned a status you've filtered out.
Can I customize what the form asks?
Not at this time. The form fields are standardized so your data stays consistent across check-ins and reporting works correctly.
Can members use this to sign themselves in?
The check-in form is for visitors and guests, not existing members. Existing members are tracked through the regular meeting attendance and assignment system.
What happens if a returning visitor checks in again?
The system updates their existing visitor record with the new check-in date and source rather than creating a duplicate. If they previously checked the "wants join info" box, that flag stays set even if they leave it unchecked the second time.