Share and Manage Club Files
Store, organize, and share documents with your club members -- all in one place. Club Files lets officers create folders for meeting minutes, role guides, budgets, and more, so every member can find what they need.
Overview
Club Files gives your Toastmasters club a central place to store and share documents. Think of it as a shared file cabinet that every member can access from the sidebar.
What officers can do: - Create and organize folders - Upload files to any folder - Move files between folders - Delete files and folders - Control which folders members can see - Designate a folder where members can upload files
What members can do: - Browse folders that are visible to them - Download files from those folders - Upload files to one designated folder (if an officer has enabled this)
You'll find Club Files in two places in the sidebar: - Club Files under the Personal section (for browsing and downloading) - Manage Files under the Club Administration section (officers only, for creating folders and managing files)
Browse and Download Files
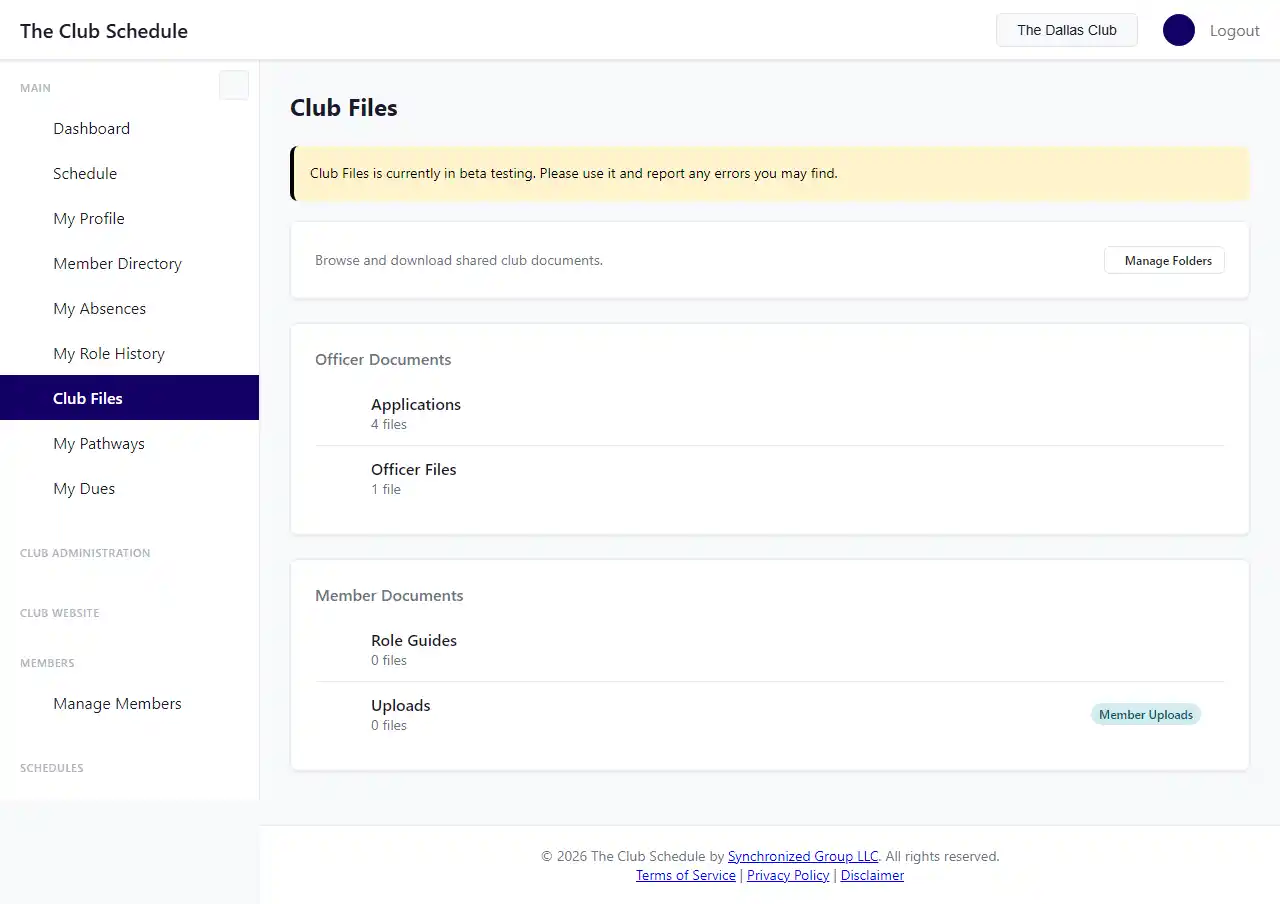
All logged-in club members can browse folders and download files.
- Click Club Files in the sidebar under the Personal section.
- You'll see folders organized into two groups:
- Member Documents -- folders visible to all members.
- Officer Documents -- folders visible only to officers (you'll only see this section if you are an officer).
- Click on a folder name to see the files inside it.
- Click the download icon next to any file to download it to your computer.
Each folder shows the number of files it contains. Folders that accept member uploads are labeled with a Member Uploads badge.
Note: Download links expire after 5 minutes for security. If a download fails, go back to the folder and click the download button again to get a fresh link.
Upload Files
Officers can upload files to any folder. Members can upload files only to a folder that an officer has specifically enabled for member uploads.
How to Upload
- Open the folder you want to upload to.
- Click the Upload File button in the top-right corner of the page.
- If you don't see this button, the folder doesn't allow uploads from your account. Ask a club officer for help.
- Click Select Files and choose one or more files from your computer. You can select multiple files at once.
- Review the file restrictions shown on the page (maximum size and allowed types).
- Click Upload.
- A progress bar will appear while your files are being uploaded. Wait for it to complete.
- You'll be taken back to the folder, where your newly uploaded files will appear.
What Happens If Something Goes Wrong
- If a file exceeds the 15 MB size limit, it will be skipped and you'll see a warning message.
- If a file type is not allowed, it will be skipped with a warning.
- If the upload would exceed your club's storage limit, it will be skipped with a warning.
- Other files in the same batch that meet the requirements will still be uploaded successfully.
- If a file with the same name already exists in the folder, your upload will be automatically renamed. For example,
minutes.pdfbecomesminutes(2).pdf.
Set Up Folders (Officers)
Before anyone can upload or share files, you need to create at least one folder.
Create a Folder
- Click Manage Files in the sidebar under Club Administration.
- Alternatively, from the Club Files browse page, click the Manage Folders button.
- Click the New Folder button.
- Enter a Folder Name (up to 100 characters). Choose a name that clearly describes the folder's purpose, such as "Meeting Minutes," "Club Photos," or "Officer Resources."
- Choose who can see this folder:
- All Members -- every logged-in club member can browse and download files from this folder.
- Officers Only -- only officers (President, VP Education, Secretary, Admin) can see this folder and its files.
- Optionally, check Allow members to upload files to this folder if you want non-officer members to be able to add files here.
- Important: Only one folder at a time can accept member uploads. Enabling this option on a new folder will automatically disable it on any other folder that previously had it enabled.
- Click Create Folder.
Your new folder will appear on the Manage Files page and in the Club Files browse page for members who have access.
Suggested Folder Structure
Here is a common setup that works well for most Toastmasters clubs:
| Folder Name | Visibility | Member Uploads | Purpose |
|---|---|---|---|
| Meeting Minutes | All Members | No | Weekly meeting minutes posted by the Secretary |
| Role Guides | All Members | No | How-to guides for each meeting role |
| Member Uploads | All Members | Yes | A place for members to share speech outlines, handouts, etc. |
| Officer Resources | Officers Only | No | Budget spreadsheets, officer transition docs, private planning files |
| Club Photos | All Members | No | Photos from meetings and events |
Edit a Folder (Officers)
You can change a folder's name, visibility, and upload permissions at any time.
- Click Manage Files in the sidebar.
- Find the folder you want to edit and click the pencil icon next to it.
- Make your changes:
- Update the folder name.
- Change visibility between "All Members" and "Officers Only."
- Enable or disable member uploads.
- Click Save Changes.
Warning: If you change a folder's visibility from "All Members" to "Officers Only," regular members will immediately lose access to that folder and all of its files. Make sure this is intentional before saving.
Delete a Folder (Officers)
You can delete a folder, but only if it is empty.
- Click Manage Files in the sidebar.
- Find the folder you want to delete and click the trash icon next to it.
- Review the confirmation message.
- Click Delete Folder to confirm.
Note: If the folder still contains files, you'll see an error message: "Cannot delete a folder that contains files. Remove all files first." You must delete or move all files out of the folder before you can delete it.
Move a File to Another Folder (Officers)
You can move a file from one folder to another without having to download and re-upload it.
- Open the folder that contains the file you want to move.
- Click the move icon (two arrows) next to the file.
- Select the destination folder from the dropdown list.
- Click Move File.
- You'll be taken to the destination folder, where the moved file will now appear.
If a file with the same name already exists in the destination folder, the moved file will be automatically renamed (for example, report.pdf becomes report(2).pdf).
Note: If your club only has one folder, you'll see a message saying there are no other folders to move the file to. Create a second folder first.
Delete Files (Officers)
Deleting a file permanently removes it. There is no undo or recycle bin.
Delete a Single File
- Open the folder that contains the file.
- Click the trash icon next to the file you want to delete.
- Review the file details on the confirmation page -- make sure you are deleting the right file.
- Read the warning: "This file will be permanently deleted. There is no way to recover it."
- Click Permanently Delete to confirm, or click Cancel to go back.
Tip: Before deleting, make sure you have a backup copy of the file if you might need it later.
Delete Multiple Files at Once
You can select and delete several files in one action.
- Open the folder that contains the files you want to delete.
- Use the checkboxes next to each file to select the ones you want to remove. You can also click the checkbox in the header row to select all files at once.
- A toolbar will appear at the top showing how many files you have selected.
- Click Delete Selected.
- Review the list of files on the confirmation page.
- Click Permanently Delete [X] Files to confirm, or click Cancel to go back.
Storage Limits and File Rules
Each club has a storage limit for all files combined across all folders.
Storage Quota
- Default storage limit: 10 GB per club.
- The storage bar on the Manage Files page shows how much of your quota you have used.
- When you approach the limit, the storage bar changes color: green at normal levels, yellow above 75%, and red above 90%.
- If an upload would exceed the storage limit, it will be rejected with a warning message.
Per-File Limits
- Maximum file size: 15 MB per individual file.
- Files larger than 15 MB will be skipped during upload.
Allowed File Types
| Category | Accepted Extensions |
|---|---|
| Documents | pdf, doc, docx, txt, csv |
| Spreadsheets | xls, xlsx |
| Presentations | ppt, pptx |
| Images | jpg, jpeg, png, gif, webp |
| Archives | zip |
Files with extensions not on this list will be rejected during upload.
Understanding Folder Visibility
Club Files uses a two-level visibility system to control who can access what.
All Members (Default)
- Every logged-in member of your club can see the folder and download its files.
- This is the right choice for documents that everyone needs, like meeting minutes, role guides, and club photos.
Officers Only
- Only members with an officer role (President, VP Education, Secretary, or Admin) can see the folder.
- Regular members cannot see that the folder exists at all.
- Use this for sensitive documents like budgets, officer transition plans, or private club business.
Member Uploads
- In addition to visibility, officers can designate one folder where regular members can upload files.
- This is useful for letting members share speech outlines, handouts, or other materials.
- Only one folder at a time can have member uploads enabled. Enabling it on a new folder automatically disables it on the previous one.
- Officers can always upload to every folder regardless of this setting.
What Happens When Your Subscription Lapses
If your club's subscription expires or lapses: - Officers can still browse and download all files (including officer-only folders). Your files are never held hostage. - Officers cannot upload, delete, move files, or manage folders until the subscription is reactivated. - Members can still browse and download files from folders visible to them.
Frequently Asked Questions
Why don't I see the "Upload File" button?
There are a few possible reasons: - You are a regular member and the folder does not allow member uploads. Only one folder can be designated for member uploads, and an officer must enable this. Look for a folder with the "Member Uploads" badge. - Your club's subscription has lapsed. Upload functionality requires an active subscription. - The folder is officer-only and you are not an officer. You should not be able to see the folder at all in this case -- if you can see it but not upload, contact an officer.
Why can't I see a folder that another member mentioned?
If another member can see a folder that you cannot, it is likely an officer-only folder. Only members with an officer role (President, VP Education, Secretary, or Admin) can access these folders. Ask your club officers for the files you need.
What happens if I upload a file with the same name as one that already exists?
Your file will be automatically renamed. For example, if minutes.pdf already exists in the folder, your upload will be saved as minutes(2).pdf. The original file is not overwritten or replaced.
Can I create subfolders (folders inside folders)?
No. Club Files uses a flat folder structure with no nesting. Each folder sits at the top level. This keeps things simple and easy to navigate for all members.
How do I increase my club's storage limit?
The default storage limit is 10 GB, which is sufficient for most clubs. If you need more storage, contact The Club Schedule support team.
Can members delete files they uploaded?
No. Only officers can delete files, regardless of who uploaded them. This prevents accidental data loss. If a member needs a file removed, they should ask a club officer.
Can I rename a file after uploading it?
Not at this time. To change a file's name, download it, rename it on your computer, re-upload it, and then delete the old version.
Is there an undo or recycle bin for deleted files?
No. Deleted files are permanently removed and cannot be recovered. Always keep a local backup of important files before deleting them from Club Files.
Who can see who uploaded a file?
Every file shows the name of the member who uploaded it and the upload date. This information is visible to anyone who can see the folder.
Tips for Organizing Your Club's Files
- Use clear, descriptive folder names. "Meeting Minutes" is better than "Docs." "Officer Transition Guide" is better than "Stuff."
- Keep the number of folders manageable. Three to six folders covers most clubs' needs. Too many folders makes it hard to find things.
- Use the "Officer Resources" pattern. Create one officer-only folder for sensitive documents like budgets and planning files.
- Enable member uploads thoughtfully. A single "Member Uploads" folder keeps things organized. Remind members what it is for.
- Clean up regularly. Old files take up storage space. Review your folders periodically and delete files that are no longer needed.
- Use consistent file naming. For meeting minutes, include the date in the filename:
2026-02-28-minutes.pdf. This makes files easy to find and sort.
Related Articles
- Club Settings Overview -- Manage your club's overall configuration
- Creating & Publishing Schedules -- Learn how the scheduling engine works
- Officer Roles & Permissions -- Understand what officers can do
Last updated: February 28, 2026